TS2017 ROUTE BUILDING #8 - Placement of Objects
TS2017 ROUTE BUILDING #8 - Placement of Objects
Finally, we can get to placing some objects into the route with the World Editor. Personally, I elected to add elements to my route in the following order:
There are four main types of objects (or items) that you will be placing into your route. Track, Road, and Scenery items are self-explanatory. The fourth one is called a Loft item. Loft items are typically bridges and other elevated objects.
It is a simple process to select and insert objects (ie. anything you would see in the sim) into your route, using the World Editor. It's a point and click process that makes placement of objects quite easy. There are object manipulation tools that allow you to move and rotate the object in any direction. You can also re-scale the object, within certain limitations.
Let's go back to our screenshot of the World Editor Control Panels to refresh our memory of the general layout of the panels:
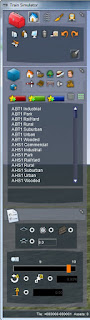
The top panel is the Toolbox. It is where you select the main tool with which you wish to work st this time. In the image above, the House symbol is highlighted. This panel, in addition to the sub panels below are specific to the placement of Scenery Objects.
The Track symbol next to the House gives you access to the track and roads features. And the paintbrush symbol brings up the sub panels pertaining to the shaping and coloring of the terrain.
The Locomotive symbol is for the creation of scenarios only. It is not typically used in the creation of a route until it is time to create the required scenarios in order for the route to appear in the list of available routes to drive.
Yes, you read that last line correctly. You must also create at least one Free Roam and one Quick Drive Scenario in order to make your route drive-able in Railworks. More on that in a subsequent tutorial when we actually have something to drive upon.
LET'S START WITH TRACK
To lay your first piece of track, start in the Toolbox by ensuring that the Track symbol is highlighted within a square. You will then see the middle and lower panels change to offer sub-options relating to track and road items. See the image below and note how much the Track control panels differ from the Scenery Object panels.
 In the lowest panel you will see a drop-down menu allowing you to select the track rules for your route. If you have not created your own (which you do not necessarily have to do), you can use one that is included with your RW installation.
Once again, bear in mind your intended outcome for the route. If you want to use track rules belonging to DLC that you have installed on your computer, you must make mention that the recipient must have the same DLC installed on their computer, or route loading problems will abound. Never mind the 10,000 locusts I mentioned earlier.
The best way to avoid issues is to use track rules belonging to a default route; that being one that came with the base program, Train Simulator. We're not getting fancy here, so the selection of "Default" track rules gives one a generic appearance. There are several European and North American track rule selections to be had within the construct of the base program. Once selected, stick with it! You will want to maintain consistency with the appearance of track and sleepers and roads throughout the route.

In addition, the track rules dictate the default speed limit of the track about to be laid. Changing track rules part way through the building process will not change the characteristics of any track already laid. Although the track speed limit can be changed with the placement of each piece of track being laid, it is best to confirm from time to time that your track rules STAY on what you had originally selected. After a program crash (which may happen from time to time) Railworks may select a different set of track rules by default when the route is opened up for editing again. It is wise to remain observant of this.
Once you have selected your track rules, you can safely place your first piece of track.
SAVE, SAVE, SAVE!
At any time, you can save your work by pressing the F2 button on your keyboard. It is highly recommended that you remember to save your progress often, or you may be one very unhappy camper if the program crashes.
More in TS2017 ROUTE BUILDING #9 - Laying Track
Back to Tutorials Home Page
Finally, we can get to placing some objects into the route with the World Editor. Personally, I elected to add elements to my route in the following order:
- Track
- Roads
- Bridges
- Water
- Structures and Buildings
- Landscaping (manual manipulation of the 'diamond points' that are often created when track and roads are laid and the terrain is 'snapped-to' the track or road)
- Foliage
- Clutter
- Sounds
There are four main types of objects (or items) that you will be placing into your route. Track, Road, and Scenery items are self-explanatory. The fourth one is called a Loft item. Loft items are typically bridges and other elevated objects.
It is a simple process to select and insert objects (ie. anything you would see in the sim) into your route, using the World Editor. It's a point and click process that makes placement of objects quite easy. There are object manipulation tools that allow you to move and rotate the object in any direction. You can also re-scale the object, within certain limitations.
Let's go back to our screenshot of the World Editor Control Panels to refresh our memory of the general layout of the panels:

The top panel is the Toolbox. It is where you select the main tool with which you wish to work st this time. In the image above, the House symbol is highlighted. This panel, in addition to the sub panels below are specific to the placement of Scenery Objects.
The Track symbol next to the House gives you access to the track and roads features. And the paintbrush symbol brings up the sub panels pertaining to the shaping and coloring of the terrain.
The Locomotive symbol is for the creation of scenarios only. It is not typically used in the creation of a route until it is time to create the required scenarios in order for the route to appear in the list of available routes to drive.
Yes, you read that last line correctly. You must also create at least one Free Roam and one Quick Drive Scenario in order to make your route drive-able in Railworks. More on that in a subsequent tutorial when we actually have something to drive upon.
LET'S START WITH TRACK
To lay your first piece of track, start in the Toolbox by ensuring that the Track symbol is highlighted within a square. You will then see the middle and lower panels change to offer sub-options relating to track and road items. See the image below and note how much the Track control panels differ from the Scenery Object panels.

Once again, bear in mind your intended outcome for the route. If you want to use track rules belonging to DLC that you have installed on your computer, you must make mention that the recipient must have the same DLC installed on their computer, or route loading problems will abound. Never mind the 10,000 locusts I mentioned earlier.
The best way to avoid issues is to use track rules belonging to a default route; that being one that came with the base program, Train Simulator. We're not getting fancy here, so the selection of "Default" track rules gives one a generic appearance. There are several European and North American track rule selections to be had within the construct of the base program. Once selected, stick with it! You will want to maintain consistency with the appearance of track and sleepers and roads throughout the route.

In addition, the track rules dictate the default speed limit of the track about to be laid. Changing track rules part way through the building process will not change the characteristics of any track already laid. Although the track speed limit can be changed with the placement of each piece of track being laid, it is best to confirm from time to time that your track rules STAY on what you had originally selected. After a program crash (which may happen from time to time) Railworks may select a different set of track rules by default when the route is opened up for editing again. It is wise to remain observant of this.
Once you have selected your track rules, you can safely place your first piece of track.
SAVE, SAVE, SAVE!
At any time, you can save your work by pressing the F2 button on your keyboard. It is highly recommended that you remember to save your progress often, or you may be one very unhappy camper if the program crashes.
More in TS2017 ROUTE BUILDING #9 - Laying Track
Back to Tutorials Home Page

